Spring Bean Life Cycle
Introduction
- In Spring, beans are the backbone of our application. They represent the objects that we have to create and manage within the Spring context.
- These beans go through a well-defined life cycle, where Spring handles everything from their creation to their destruction.
-
Different stages of Bean Life Cycle are as below :-
- Loading Bean Definitions : Spring reads the configuration (XML, Java, or annotations) to understand how to create and configure beans, including their properties and dependencies.
- Bean Instantiation : Spring creates bean instances using constructors or factory methods. Then dependencies are injected through constructor OR setter OR property injection.
- Bean Initialization : After bean is instantiated and its properties are set, Spring performs initialization by calling an init() method OR afterPropertiesSet() method (from the InitializingBean interface) OR @PostConstruct annotation.
- Bean Usage : The fully initialized bean is now ready for use. It can interact with other beans or components in the application.
-
Bean Destruction :
Upon container shutdown, Spring destroys the bean. This can be done via custom destroy() method OR DisposableBean (interface) OR @PreDestroy annotation for cleanup.
-
Below is the diagram representing Bean Life Cycle :-
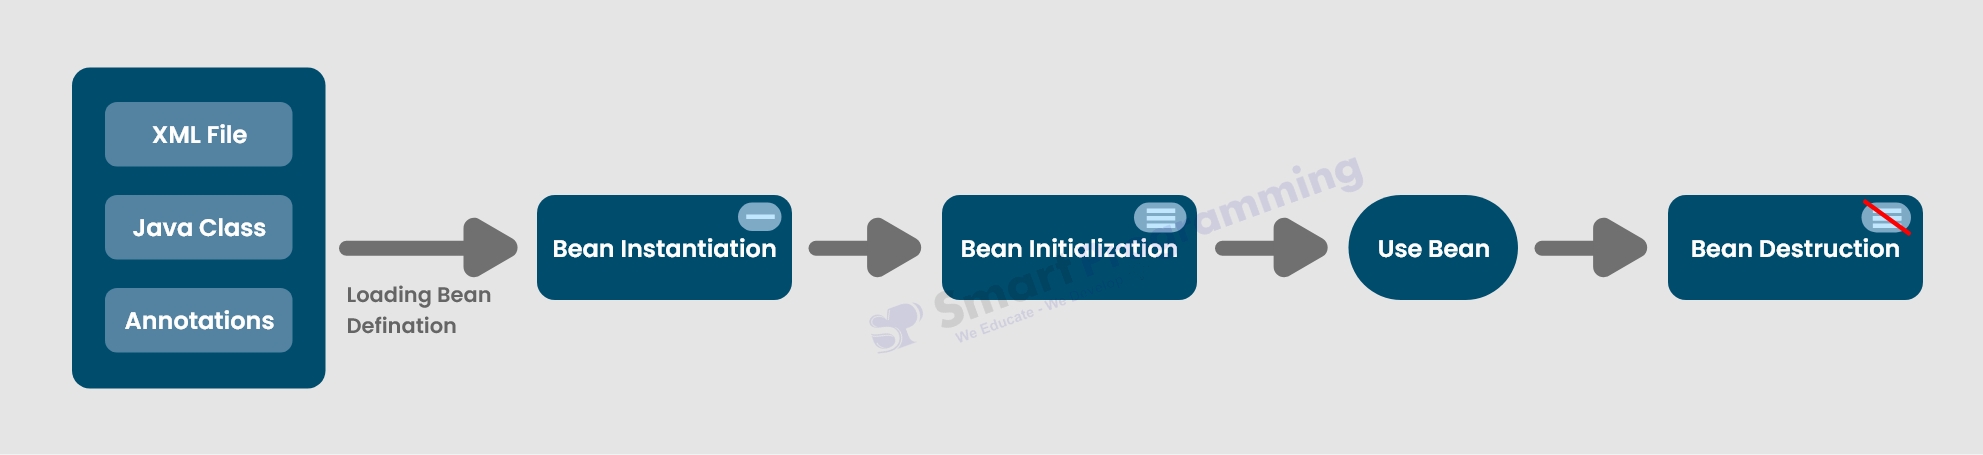
1. Loading Bean Definitions :
- What Happens: Spring first reads and understands the definitions of all the beans in the application. These definitions are like blueprints that tell Spring how to create and configure beans.
-
Where Definitions Come From: These configurations can be provided by different ways as below:
- XML Configuration: In the old days, beans were defined in XML files.
- Java Configuration: With the rise of Java-based configuration, we can define beans using @Configuration and @Bean annotations.
- Annotations: With annotations like @Component, @Service, etc., we can let Spring automatically discover and register beans.
- What Spring Understands: In this stage, Spring knows the class of each bean, its properties (like name, rollno, emailid in Student class) and its dependencies (other beans it needs).
2. Bean Instantiation :
- What Happens: Once Spring knows what beans it needs to create, it creates instances of those beans. This is the instantiation phase.
-
How Beans Are Created: Beans can be created by different ways as below:
- Default Constructor: A no-argument constructor is used.
- Static Factory Method: A static method on a class that returns an instance of the bean.
- Instance Factory Method: A non-static method on a separate factory class.
-
Dependency Injection: During instantiation, dependencies are injected into the bean. This can be done in three ways:
- Constructor Injection: Dependencies are provided through the constructor.
- Setter Injection: Dependencies are set using setter methods.
- Property Injection: Dependencies are set using XML
tags or annotations like @Value (in Java-based config).
- Example: If we configure a Student bean with name, rollno, and emailid, Spring injects the property values (like name Deepak, rollno 102 and email id as deepak@gmail.com in this example) in this phase (e.g., through setter methods or annotations).
3. Bean Initialization :
- What Happens: After a bean is created, it’s initialized by setting its properties to their configured values. This is where any external dependencies, such as values from a configuration file, are injected into the bean.
-
Different Ways to Initialize: Beans are initialized by different ways as below:
- Using init() method: We can define a custom initialization method in our bean.
- Using afterPropertiesSet(): This method from the InitializingBean interface is called to perform any necessary initialization.
- Using @PostConstruct: A special annotation that indicates a method to be run after all properties are set.
- Example: Here the bean is prepared for use. This includes setting properties (if not already done in instantiation), performing validation, setting up database connections, initializing caches, configuring logging, and executing any custom initialization logic such as loading configuration files or establishing network connections.
-
Additional Functionality:
-
Aware Interfaces:
If the bean implements special interfaces, it can access the container or its environment. For example:
- BeanNameAware: Allows the bean to know its own name.
- ApplicationContextAware: Provides access to the Spring ApplicationContext.
- BeanFactoryAware: Gives access to the BeanFactory (for bean creation).
-
Aware Interfaces:
If the bean implements special interfaces, it can access the container or its environment. For example:
- Optional Customizations: At this point, we can also use BeanPostProcessor to add custom logic before and after the bean’s initialization. This is useful for advanced scenarios like modifying beans dynamically or adding cross-cutting concerns (e.g., logging or security).
4. Bean Usage :
- What Happens: Now that the bean is initialized, it’s ready to be used. Other beans or components in the Spring application can access and use this bean. The bean is fully functional and serves its purpose in the application.
5. Bean Destruction :
- What Happens: When the application shuts down or the Spring container is closed, Spring cleans up by destroying the beans.
-
How Beans Are Destroyed:
- Using destroy() method: We can define a custom destruction method in the bean.
- Using DisposableBean interface: This interface provides a destroy() method to clean up resources when the bean is no longer needed.
- Using @PreDestroy annotation: This annotation marks a method to be called before the bean is destroyed.
- Optional Aspects: If the bean doesn't require any special clean-up, Spring will skip these methods.
Help Us Get Better Every Day
Your feedback helps us grow! If there's anything we can fix or improve, please let us know.
We’re here to make our tutorials better based on your thoughts and suggestions.
Get Upto 80% off on our
Industry Level Courses