Spring Interview Questions - 3
11. Explain the Bean Life Cycle in Spring ?
In Spring, beans represent the core objects that are managed within the Spring IoC (Inversion of Control) container.
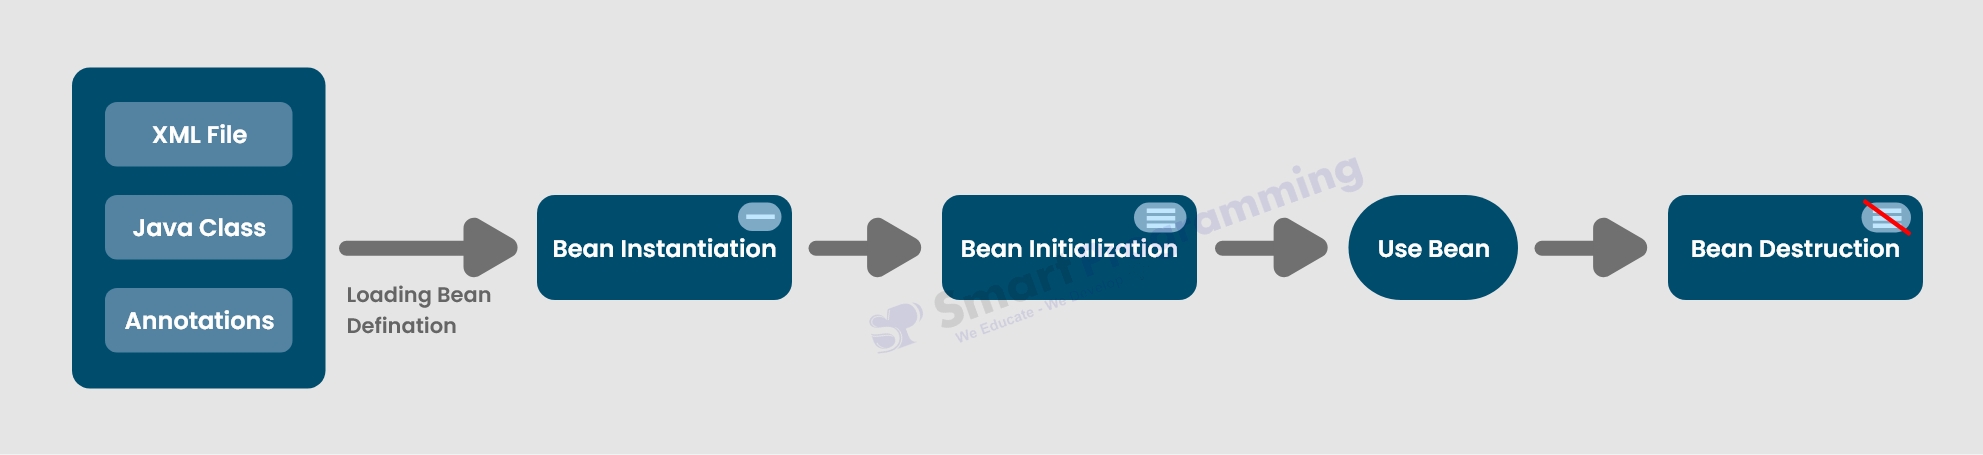
Below are the Spring Bean Life Cycle stages :-
- Loading Bean Definitions: Spring reads the configuration (XML, Java Configuration Classes or Java Annotations) to understand bean definitions, including their properties, dependencies and scope.
- Bean Instantiation: Spring creates instances of the beans. Dependencies are injected via constructor, setter or field injection based on the defined configurations.
-
Bean Initialization:
After instantiation and dependency injection, Spring performs initialization.
This can be customized using:- init() method in XML
- afterPropertiesSet() from the InitializingBean interface
- @PostConstruct annotation
- Bean Usage: The fully initialized bean is now ready for use within the application. It can interact with other beans and components as needed.
-
Bean Destruction:
When the application shuts down, Spring performs bean cleanup by calling:
- Custom destroy() method (if defined in XML)
- destroy() from the DisposableBean interface
- @PreDestroy annotation
12. What is Dependency Injection in Spring AND why is it used (OR why DI is important) ?
- Dependency Injection is a "Design Pattern" that implements the IoC(Inversion of Control) principal.
- Dependency Injection, as the name suggests, is about "injecting" one object (the dependency) into another object that depends on it.
-
In Spring, Spring Container handles the Dependency Injection automatically.
-
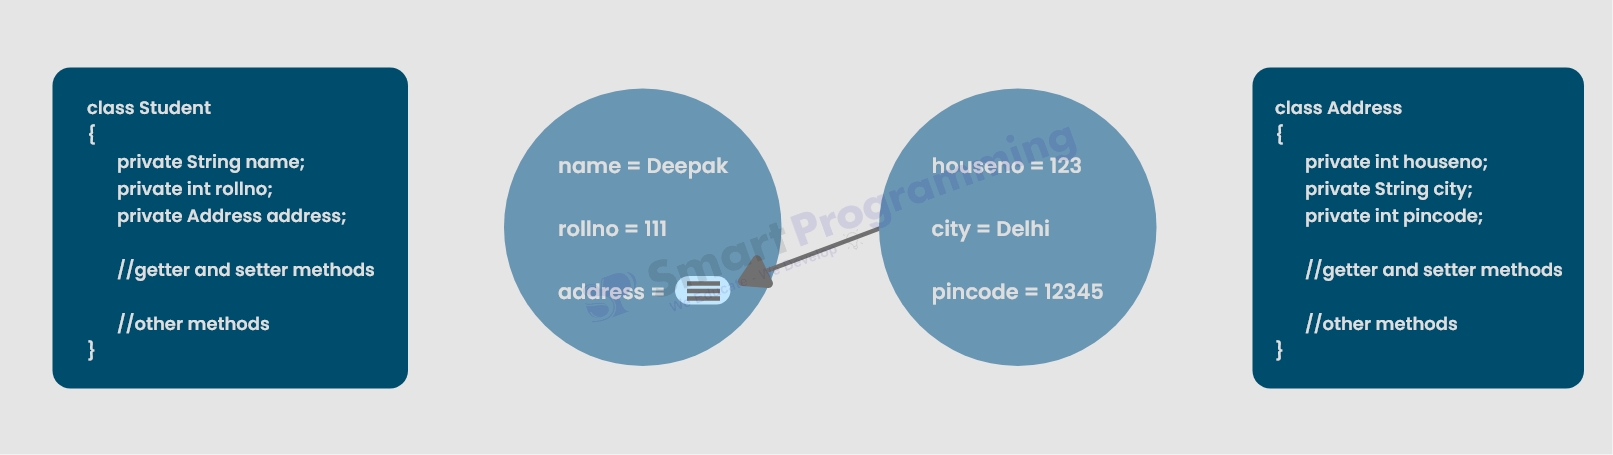
Below diagram shows the dependency injection in which Address object is "injected" int Student object :
-
Why is Dependency Injection Used / Important in Spring :-
- Loose Coupling: DI promotes loose coupling, making each component or class independent. This ensures that changes in one class do not affect others.
- Improved Testability: With DI, classes can use mock (fake) dependencies for easy unit testing, without changing the main code.
- Flexible Configuration Management: DI in Spring allows for flexible runtime configurations where dependencies can be changed based on different environments (e.g., development, testing, production) without modifying code.
- Promotes Reusability and Scalability: With DI, classes become reusable components that can be shared across different parts of an application or even different projects, contributing to scalable application design.
- Click Here for Dependency Injection program.
- Click Here to read Dependency Injection more deeply.
13. What are the types of Dependency Injection and which is more preferred in Spring ?
Below are the types of Dependency Injection :-
-
Constructor Injection:
- In this, dependencies are provided through the constructor of the class.
- It ensures immutability and mandatory dependencies.
- It is the most preferred method as it ensures that all required dependencies are injected at the time of object creation.
-
Setter Injection:
- In this, dependencies are provided via setter methods after the object is created.
- It is suitable for optional dependencies.
- It is less preferred than constructor injection, as it allows for changes to be made after object creation, which can lead to potential issues.
-
Field Injection:
- In this, dependencies are injected directly into the fields of the class using annotations like @Autowired.
- It is very less preferred due to lack of visibility into dependencies, making it harder to test and maintain.
- It is not recommended for large applications due to testability and immutability issues.
Constructor Injection is the most preferred method because it enforces immutability and ensures that the dependencies are not null and are required at the time of object creation. This leads to better maintainability and testability.
14. Explain the difference between Constructor Injection and Setter Injection ?
| Feature | Constructor Injection | Setter Injection |
|---|---|---|
| Definition | In Constructor Injection, dependencies are provided through the class constructor. | In Setter Injection, dependencies are injected through public setter methods after the object is created. |
| When to Use | Best for mandatory dependencies, as these dependencies are required at the time of object creation. | Ideal for optional dependencies or cases where dependencies might need to be changed after the object has been created. |
| Object Creation | Dependencies are provided at the time of object creation, making them mandatory. | Dependencies can be set or modified after the object is created. |
| Testability | Good for testing as all dependencies are injected upfront, making it easy to provide mock dependencies. | Also testable, though less ideal for mandatory dependencies as it allows for later modifications. |
| Circular Dependency Handling | Can create issues with circular dependencies, as all dependencies must be resolved at creation. | Handles circular dependencies more gracefully, as dependencies can be set post-creation. |
| Immutability | Promotes immutability as dependencies are usually final after construction. | Allows mutable dependencies, as setters can be called to change dependencies later. |
- Constructor Injection is generally better for required dependencies, as it ensures that objects are created with all necessary dependencies. This improves code reliability and makes it clear that the dependency is mandatory.
- Setter Injection is preferable for optional dependencies or cases where we want to change the dependency post-creation. It can handle circular dependencies more easily but might lead to mutable dependencies, which can be a drawback for some use cases.
15. What are different ways to achieve Dependency Injection in Spring ?
There are 3 main ways to achieve DI in Spring :-
- Using Java Configuration File
- Using XML Configuration
- Using Annotations (@Component and @Autowired)
-
1. Using Java Configuration File
- How: By using @Configuration and @Bean annotations in Java classes.
-
Types of DI:
- Constructor Injection: Achieved by defining the dependencies in the constructor within a @Bean method.
- Setter Injection: Achieved by setting dependencies using setter methods in the @Bean method.
- Field Injection: Though not common in Java configuration, we can use @Autowired directly on fields, but constructor and setter injection are generally preferred in this case.
-
Example:
@Configuration
public class AppConfig
{
    @Bean
    public Engine engine()
    {
        return new Engine();
    }

    @Bean
    public Car car(Engine engine)
    {
        return new Car(engine); // Constructor Injection
    }
}
-
2. Using XML Configuration
- How: By defining beans and their dependencies using XML configuration (applicationContext.xml).
-
Types of DI:
-
Constructor Injection:
Achieved using the
<constructor-arg>tag to inject dependencies into the constructor. -
Setter Injection:
Achieved using the
<property>tag to inject dependencies through setter methods. - Field Injection: Not directly supported in XML configuration, as XML does not have direct support for annotations like @Autowired for field injection.
-
Constructor Injection:
Achieved using the
-
Example:
<!-- Constructor Injection -->
<bean id="engine" class="com.example.Engine"/>
<bean id="car" class="com.example.Car">
    <constructor-arg ref="engine"/>
</bean>
<!-- Setter Injection --> <bean id="engine" class="com.example.Engine"/> <bean id="car" class="com.example.Car"> <property name="engine" ref="engine"/> </bean>
-
3. Using Annotations (@Component and @Autowired)
- How: By using annotations like @Component, @Service, @Repository, and @Autowired to define beans and inject dependencies.
-
Types of DI:
- Constructor Injection: Achieved using @Autowired on the constructor, which Spring uses to inject dependencies automatically.
- Setter Injection: Achieved using @Autowired on setter methods.
- Field Injection: Achieved using @Autowired directly on fields.
-
Example:
@Component
public class Car
{
    private Engine engine;

    @Autowired
    public Car(Engine engine) // Constructor Injection
    {
        this.engine = engine;
    }
}

@Component
public class engine
{
    // Engine implementation
}
Points to remember :-
- Java Configuration (@Bean): Can achieve constructor, setter, and field injection (though field injection is rare in Java config).
- XML Configuration: Can achieve constructor and setter injection, but not field injection.
- Annotations (@Component, @Autowired): Can achieve constructor, setter and field injection.
Help Us Get Better Every Day
Your feedback helps us grow! If there's anything we can fix or improve, please let us know.
We’re here to make our tutorials better based on your thoughts and suggestions.
Get Upto 80% off on our
Industry Level Courses